Saturday, July 8, 2017

Step covers for Rocky - On the cheap!


We had carpeted step covers on our previous travel trailers which were a really nice touch. Step covers provide a slip-resistant surface and help keep dirt out of the trailer. So, we naturally wanted step covers on the steps of our new Rockwood. The problem was our last trailer only had one step. Rocky has 6!  The step covers on Amazon run about $20 each which would cost $120 for all 6 steps!  Ouch...

I decided that I could accomplish the same thing for a lot less! First stop was Home Depot. Here, I found indoor/outdoor carpet runner. Also added to my cart were a General Tool Grommet Kit and two packages of additional grommets. The cost of supplies for this project:

Carpet runner, 9 feet at 2.26/linear foot = 20.34
Grommet Kit                                          =   9.97
Two packs of additional grommets        =   5.34
 TOTAL                                                   =  35.65

So far, so good!  Less than the cost of just two ready-made step covers!

Here's how I completed the project:

Step 1:  My steps are 9 inches wide, so I cut 6 lengths of carpet runner, each18" long. 18 inches provided cover for the step surface and with the wrap-around the edges, that left a gap on the underside of about 2 inches.


Step 2: The carpet runner was too wide for my steps so I trimmed each piece along the sides. The design in the carpet provided a perfect guide for cutting.  I simply cut each side, following the outside groove in the design.


Step 3: On the backside of the carpet, I measured 1-1/2 inch in from each leading edge and marked each side at the midpoint and then an additional mark 2 inches from each end.  Three "bullseyes" along each edge mark the spots for punching the grommet holes.


Step 4: Using the hole punch in the grommet kit, a hammer, and a scrap piece of wood, I punched a hole at each "bullseye." 


Step 5: I added a piece of Gorilla Tape (regular duct tape would work fine too) over each hole to reinforce it.
* The tape was an after-thought but I highly recommend it. The first step I finished had the grommet rip the hole a bit. The tape solved that problem nicely. I then re-punched the tape. You could add the tape first and just punch once.  


Step 6:  Following instructions in the grommet kit, add a grommet to each punched hole. First, place the grommet on the supplied anvil. Then place the hole punched in the carpet over the grommet. 


Step 7:  Place the "eye" of the grommet over the grommet.  


Step 8: Using the supplied grommet tamp, tap the grommet with a hammer to set it. 


Step 9: Repeat for all holes in all pieces of carpet. In my case, that meant 6 grommets on 6 carpet pieces for a total of 36 grommets. 


Step 10: Center the step cover on the step. 


Step 11: On the underside, thread a zip tie through opposing grommets and tighten snugly. 


Step 12: Trim the zip ties. 


Step 13: Repeat for all steps. 


Step 14: Admire your completed work!


Thursday, July 6, 2017

The matter of keys...


Our first travel trailer was a 28' Dutchman Kodiak. It had a front and rear door as well as two undercarriage storage compartments.  Each door - all four of them - had a unique key. Drove me crazy! Trying to remember which key went with which door was highly frustrating! When we sold the Kodiak, we downsized to an RPod. It had only one entrance door which meant only one door key but it had another key for the storage underneath. In addition to these, there was the key for the coupler lock and the hitch pin. Keys and more keys!

If you've been following this blog, you know that we recently bought a new Rockwood travel trailer - affectionately nicknamed Rocky. Like our original Kodiak, Rocky has a front and rear door, two storage compartment doors, and an access panel to the outdoor shower. Before we picked up Rocky, I was assuming (hoping) that the Kodiak's assortment of keys was an anomaly. Surely, I reasoned, THIS trailer will have its doors keyed alike. Sadly, no. Rocky has four unique keys for the doors and compartments. Plus the extra keys for the coupler, hitch pin, etc.

To compound the overall key frustration, we learned that in the world of RVs there are, surprisingly, a fairly limited number of different keys out there. The folks where we stored our Kodiak told us they had a set of keys that "pretty much fit any travel trailer on the lot." Yes, it's true. There's a good chance you and some of your fellow campers share the same key. So we're not only deviled with a fist-full of keys for our units but we also live with the knowledge that our homes-on-wheels are far from secure.

The ideal solution would be to replace all the factory-installed locks with new combination locks - all set to the same combination. We are seriously considering this solution for Rocky. The good ones are a bit pricey though and we need to get past the initial purchase outlay before making another big investment in our new toy.

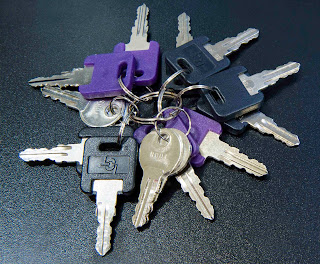
So, until that upgrade happens, Carol & I decided to conquer the battle of the keys. Our simple (and cheap) solution was dollar key rings with coiled wrist bands and a 98¢ package of plastic key color codes. Since we come and go through the rear entrance door 90% of the time and use the undercarriage storage compartments 99% more than the outdoor shower compartment, the rear entrance door and storage compartment door each got a green plastic cap (green for go, since those are the doors I "go to" most often).  This simple solution has saved me so much time from fumbling around with the wrong key for the wrong door. The other part of our solution is collecting all the keys (for the trailer, hitch, coupler, etc) on the wrist band key ring. When we're out camping, I'm wearing the wrist band all day. No more searching for "lost keys" or wondering where I laid them down. Not a perfect solution, but a big improvement until we pop for replacement, combination locks.


Wednesday, July 5, 2017

Rocky's first boo-boo...

Well, it was bound to happen. You know the drill - you buy a new car and the day shortly arrives when you get that first door ding. A travel trailer is not prone to door dings, but there are a thousand other things that can happen. For us, Rocky's first incident was a damaged recliner. To bring the slide in requires that the two recliners be moved side by side in front of the rear entrance, behind the kitchen counter, and then strapped for travel. What I didn't consider was the movement of the trailer during travel would be rocking the recliner and causing it to rub against the kitchen cabinet. On the morning after our first day of travel, I was sitting in my recliner enjoying morning coffee and felt something strange under my fingers on the left arm of the chair. The vinyl upholstery had a hole abraded in it from the previous day's travel!


After getting past that initial sick feeling, I Googled remedies for vinyl repair. The first thing that came up in my search was Gorilla Tape, of which I just happened to have a roll in my tool bag! Gorilla Tape is duct tape on steroids and comes in basic black. Our recliners are a deep, dark brown - nearly black - so Gorilla Tape seemed a reasonable solution.  A small piece did the trick.


It remains to be seen how permanent this fix proves to be, but we used Gorilla Tape previously to cover the hole in our RPod's exterior when we threw a rock through the front fiberglass panel last summer (see my previous post). Not only did Gorilla Tape keep the weather out until we made permanent repairs, but it proved to be quite difficult to remove! So, I have a reasonable expectation that this will suffice for my recliner.

Needless to say, I am now much more careful when strapping down my recliners for travel. A big, bulky blanket also goes over the arms to add extra padding between them and the kitchen cabinet.

Tuesday, July 4, 2017

Counter Top Extension Mod

Our new Rockwood 2604 came with a counter top extension. At first, I wasn't sure we'd want to use it. Since we had it with us on our trip to pick up the trailer though, we gave it a try. We discovered that the extra couple of feet of counter space by the sink is actually a really nice addition.


What I didn't like about it though was how it attached to the cabinet. It had a pair of steel tabs that sat into corresponding steel slots to support it on the end of the cabinet and a swing-out adjustable leg to support the free end. 


This arrangement meant that when you're ready to travel, you must remove the entire assembly and stow it somewhere. The only place we found for it to safely travel was on the bedroom floor. Not a huge deal I suppose, but a bit of a pain when you're ready to roll. Plus, if you're only stopping for a quick overnight and don't need the counter top extension, you really had no choice but to install it anyway just to get it off the floor.

It occurred to me that a far better arrangement would be for the extension to simply fold down on the end of the cabinet. This seemed a really simple solution and rose to the top of my list of "must do" modifications when we got home.

A quick run to Home Depot yielded the two simple parts that I needed to complete this mod.
  • 12-inch steel piano hinge
  • 3-inch stainless steel hook and eye latch

Step 1: Remove the old hardware.

Step 2: Install piano hinge on the underside of countertop extension.


Step 3: Attach piano hinge to end of the cabinet.


Step 4: Attach latch to the underside of counter extension and the eye-hook to the cabinet. The latch holds the extension snugly against the cabinet so it doesn't bang around during travel. 


Step 5: Admire my work!


The result is a vast improvement.  Flip up if needed; leave down if not needed. No more moving it back and forth to the bedroom and tripping over it on the floor. Rockwood, if you're listening, this would be a great addition straight from the factory!  

Sunday, July 2, 2017

MILTON / MADISON SE KOA

I mentioned in my last post that we stayed at a KOA in Milton, Wisconsin - specifically, the Milton/Madison SE KOA.  This is a new KOA and a really nice one!  Despite less than ideal weather during our three-night stay, we thoroughly enjoyed ourselves here. The bathhouse is clean and modern.  The camp's store is much more widely stocked than most KOAs with all the camping essential and area souvenirs. To the rear of the store is a beautiful pool area. The rural property includes acres of rolling green recreation fields. It's located a short ride from Madison and about 60 miles from Racine. If your travels take you to southern Wisconsin, I highly recommend this campground!

Entrance to Milton/Madison SE KOA, Milton, WI
"Rocky" at Milton/Madison SE KOA

"Rocky" at Milton/Madison SE KOA

Wisconsin sunset